

Dutch Oven 101 - Frequently Asked Questions
Have you always wanted to try Dutch oven cooking and been too intimidated to start? Well, you've come to the right place. I've been cooking with Dutch ovens - indoors and outdoors - for many years. If a recipe fits inside a Dutch oven, I've cooked it in one. This week's video is dedicated to answering the questions that keep most people away from trying to cook outdoors with Dutch ovens. I promise that you'll be ready to start when you finish watching.
You're on your way to becoming a Dutch oven cook!
We appreciate you sharing our recipes with your friends and family!
Dutch Oven 101
There is a difference between an outdoor Dutch oven and an indoor Dutch oven. Outdoor Dutch ovens have a raised rim around the lid for holding coals, and legs on the bottom to rest over coals or over a trivet. Indoor Dutch ovens have flatter lids and a smooth bottom.
Shallow Dutch Ovens vs. Deep Dutch Ovens
The shallow Dutch oven on the right is great for biscuits, casseroles, and pizza. Basically, anything that doesn't rise or need a lot of room. The Dutch oven on the left is a 12" deep, and that's better for cakes, cobblers and bread.
American Made Dutch Oven Cooking Accessories
Cooking outdoor with Dutch ovens means putting coals over the lid. If you are cooking something that rises, it will be so close to the coals that it could burn if you use the shallow oven.
Tip: You can target heat towards one side of the oven or other as needed by simply shifting coals from one side to the other.
For beginners starting out, I'd suggested getting these two Dutch ovens (12" shallow and 12" deep). Between the two of them, you can cook just about anything you want to and they do not weigh much (at least as far as Dutch ovens go!).
Recommended Accessories to go with your Dutch Oven
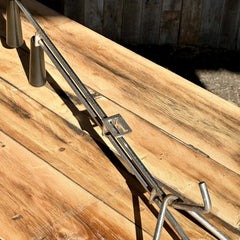
Lid lifter - You can always use the end of a claw hammer but you might burn the hair off your knuckles if you do!
Ash shovel - You can buy one or just get a regular old shovel and drill some holes about the diameter of a quarter. This will allow you to shovel good hot coals onto the lid and around the bottom of the oven without carrying a bunch of ash with you. Just shovel the coals, shake them around a bit and the dead ash falls through the holes.
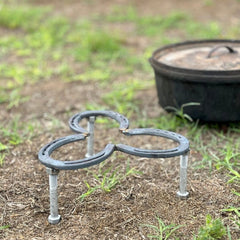
Trivet - Outdoor Dutch ovens come with legs, and you can cook on or in the ground with hot coals - no problem. I show you how to do so in this video, even. But the fact stands that I really like cooking with a trivet, and if you're cooking in many ovens at once, you can even stack them using a trivet.
We custom designed our own trivet with interchangeable legs in 3.5 and 5.5 inches so that you can better target heat. I cook with one or two every week almost, and I can't emphasize how convenient they are and how much more flexibility you have if you add one of these to your camp kit. Plus, the legs are bolts so you could even find others in different sizes to suit your needs and they'll screw right into the trivet.
Fuel for the Fire
Never use charcoal briquettes. Please, just don't. You don't want your food tasting like motor oil.
Good hardwoods offer more heat and better flavor. Go past the briquettes and find some good Hardwood lump charcoal. I prefer Fogo brand because it seems to always burn a long time and when you're running Dutch ovens all day to feed a few dozen hungry cowboys, you need reliable heat.
How to Make Your Own Coals Out of Hardwood
You can make your own coals by splitting hardwood into chunks about the size of baseballs. Start the day early, because you'll need to burn them until they're very hot and then starve them of oxygen so they will become coals. When they've burned until they turn white, you're ready to add them to the lid and around the bottom of your Dutch ovens. These homemade coals will last longer than storebought.
Do not try to burn wood into coals on concrete. Concrete will blister and buckle at these temperatures.
Be Aware of Local Drought Conditions
Cooking with hot coals requires you to prepare the ground by removing any grass that's there. I burn away the grass I need with a propane torch. If you attempt this, be very cognizant of local drought conditions and if there is a burn ban, don't cook using coals on the ground. Just don't. It's not worth starting brush fires or forest fires.
Coal Placement
I never put coals directly underneath a Dutch oven. I find that it burns the food - instead, place the coals in a ring around the outside edge of the Dutch oven. If you need more heat, move the coals closer. If you need less, move them further away. Load up the lid with coals for the top and you've got a great cooking source.
Tip: Rotate the lid one way and the oven the other often during cooking. This will help evenly distribute the heat if some coals are hotter than others and help prevent burning.
Stacking Ovens
The video does show how to stack ovens. You will need multiple trivets to do this. This method conserves heat because the coals on the lid of one oven become the coals for the bottom of the top oven. You need to be careful, obviously, because towers can tumble and you don't want anyone getting burned and getting the food ruined.
We thank you for watching our videos and coming here for your cast iron cooking! Get out there and enjoy yourselves. Feed your friends and family. Search at our YouTube channel or here on our website and you'll find just about any question you might have answered. Please subscribe to our YouTube channel if you haven't already, and follow us on Facebook for weekly recipes and event updates!
God bless each and every one of you.